How to Track Button Clicks Using Google Tag Manager and GA4
This step-by-step guide will help you set up tracking, create triggers and tags, and analyze your data to gain valuable insights into user interactions.

Recording button clicks on your website is a crucial aspect of understanding user behavior and measuring engagement. Google Tag Manager (GTM) and Google Analytics 4 (GA4) make this process streamlined and efficient. In this blog post, we'll walk you through the steps to set up and record button clicks using GTM and GA4.
Let’s get started! 👇
Step 1: Set Up Google Tag Manager
First, ensure that Google Tag Manager is installed on your website. If it's not already installed, follow these steps:
Create a GTM Account:
- Go to the Google Tag Manager website.
- Click "Create Account" and follow the prompts to set up your GTM account.
Install the GTM Container Code:
- After creating your account, you’ll be given a container code.
- Copy the code snippets and paste them into your website's HTML, just before the closing
</head>and</body>tags.
Step 2: Create a Trigger in GTM
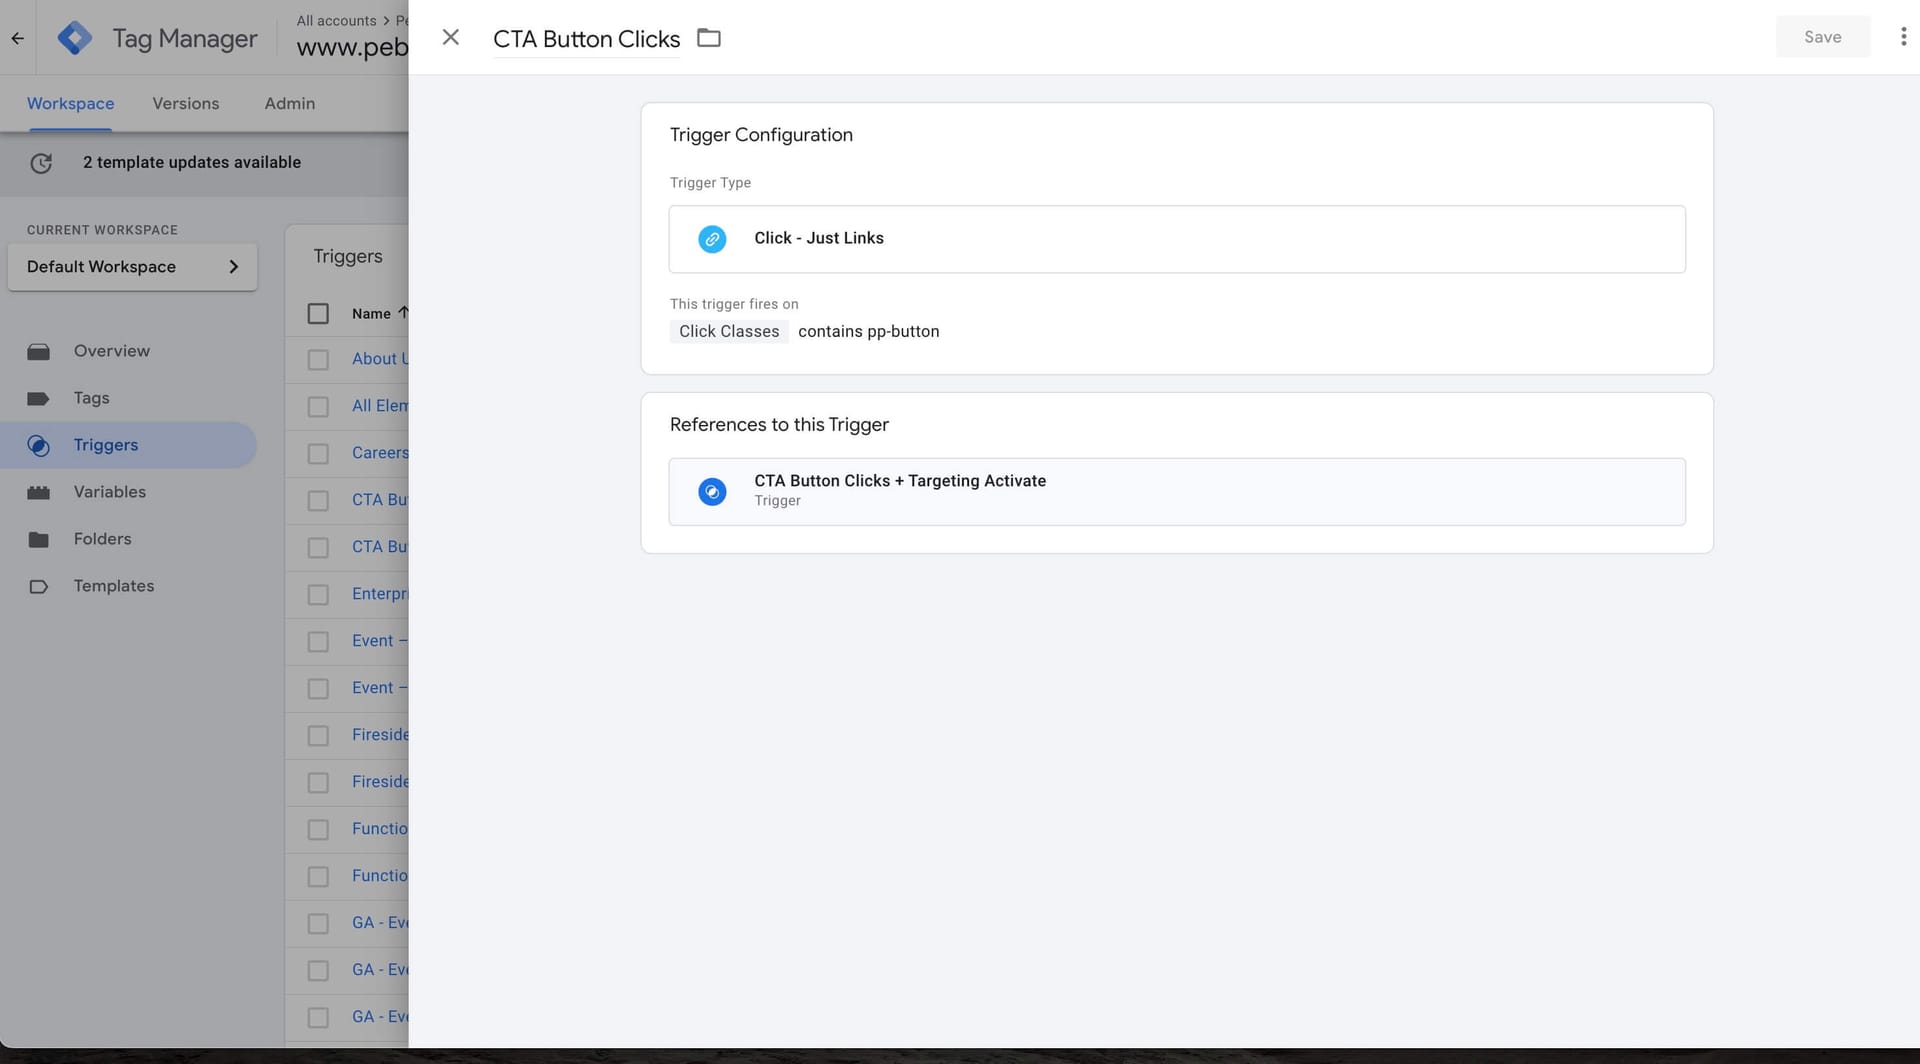
CTA Button Clicks Trigger
A trigger in GTM is an event that you want to track—in this case, button clicks.
Go to GTM Dashboard:
- Open your GTM account and select the appropriate container.
Create a New Trigger:
- Click on "Triggers" in the left-hand menu.
- Click the "New" button to create a new trigger.
Configure the Trigger:
- Name your trigger (e.g., "Button Click Trigger").
- Choose "Click – All Elements" as the trigger type.
- Configure the trigger to fire on specific clicks. You can set conditions such as "Click ID" or "Click Classes" to specify which button clicks you want to track. For example:
- Click ID: equals to your-button-id
- Click Classes: contains your-button-class
In our case, this was easy. All of our CTA buttons on the site contain the classname pp-button.
Step 3: Create a Tag in GTM
Tags are snippets of code that send data to a third party (e.g., Google Analytics).
Create a New Tag:
- Click on "Tags" in the left-hand menu.
- Click the "New" button to create a new tag.
Configure the Tag:
- Name your tag (e.g., "GA4 - Event - CTA Button Clicks").
- Click on "Tag Configuration" and select "Google Analytics: GA4 Event".
- Enter your GA4 Measurement ID (found in your GA4 property settings under "Data Streams").
Set Up Event Parameters:
- Event Name: cta_button_click
- Event Parameters: Add any parameters you want to track. Common parameters include:
- cta_button_url: {{Click URL}}
- cta_button_text: {{Click Text}}
- cta_button_page_url: {{Page URL}}
Add Trigger to Tag:
- Click on "Triggering" and select the "Button Click Trigger" you created earlier.
Save and Publish:
- Save your tag and submit your changes in GTM by clicking "Submit" and then "Publish".
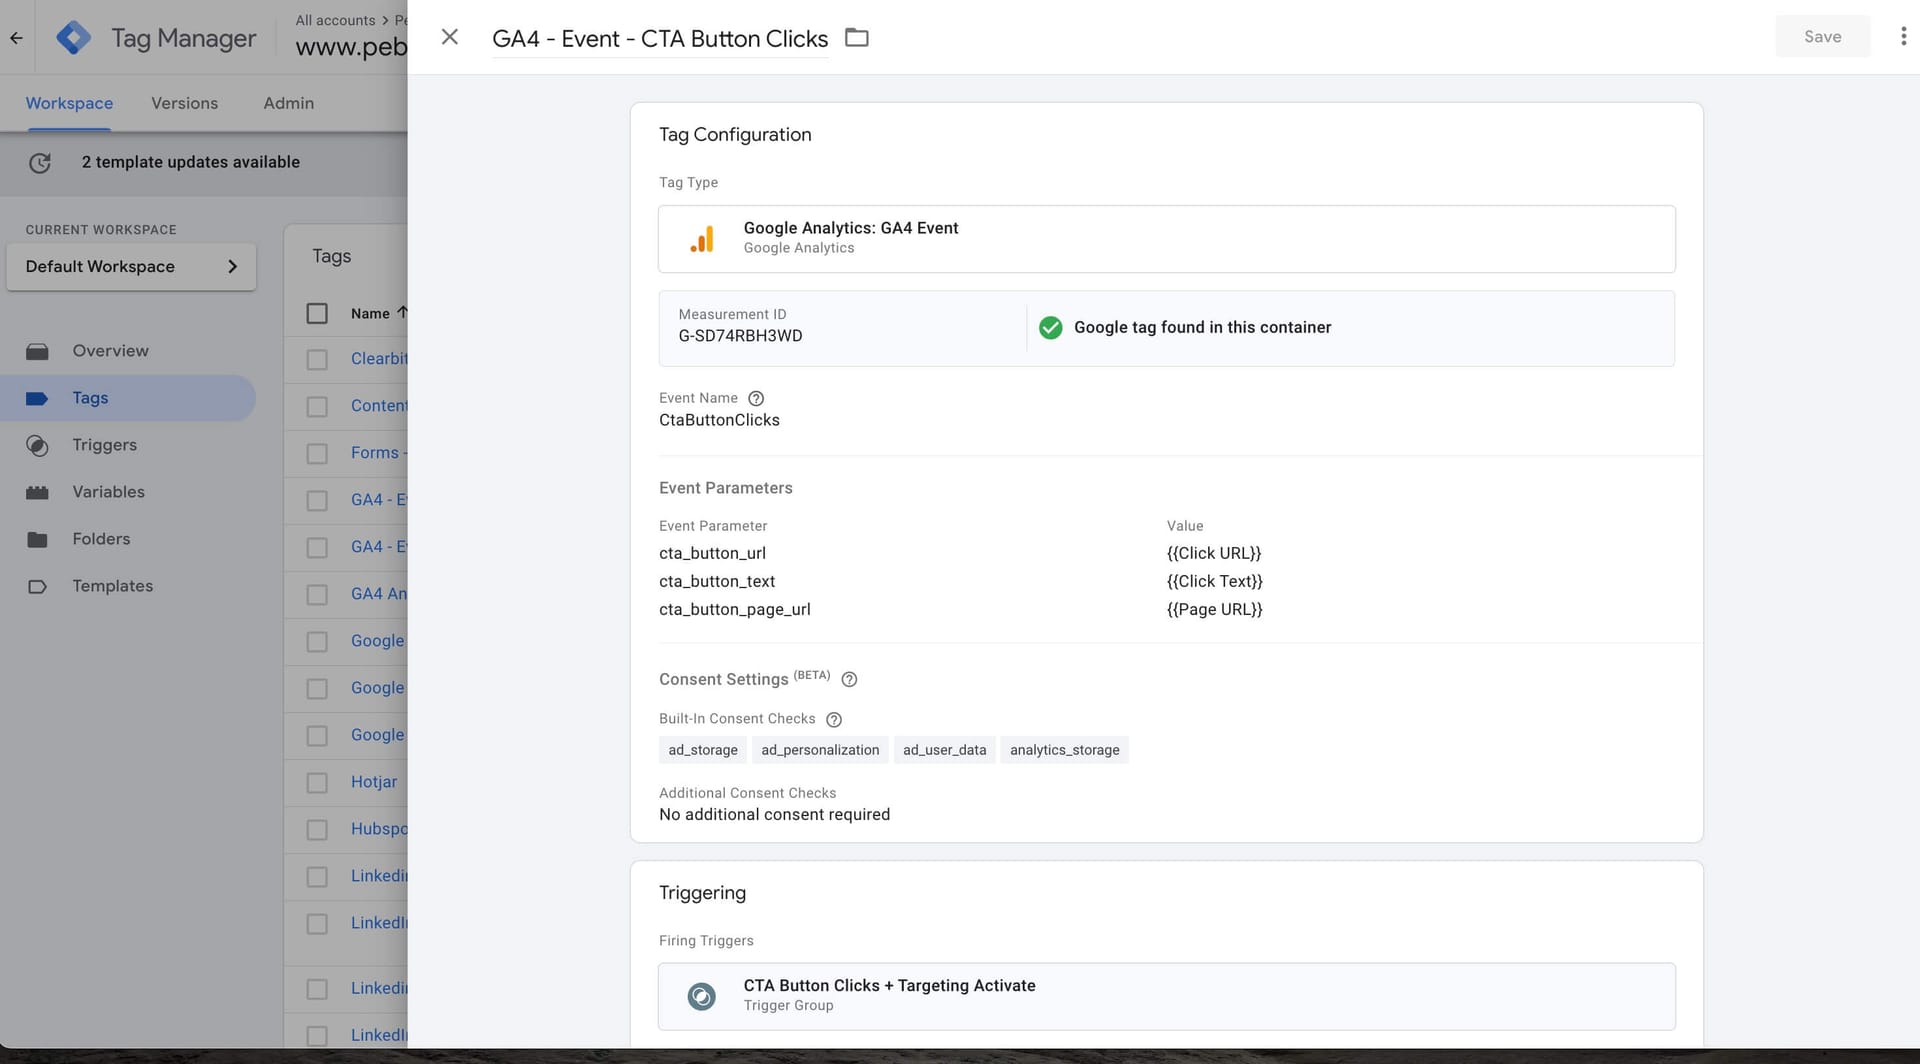
GA4 - Event Tag
Step 4: Verify Your Setup
After publishing your GTM container, it's essential to verify that the button clicks are being recorded correctly.
Use GTM Preview Mode:
- In GTM, click on "Preview" to enter the preview mode.
- Open your website in the same browser. The GTM debug panel will appear at the bottom of the screen.
- Click the button you configured to track and check if the event fires correctly in the GTM debug panel.
Check GA4 Real-Time Reports:
- Go to your GA4 property and navigate to "Real-time" reports.
- Click the button on your website and see if the event appears in real-time reports.
Step 5: Add Custom Dimensions to GA4
Adding custom dimensions to Google Analytics 4 (GA4) allows you to track additional information that isn't automatically collected. This can be particularly useful for tracking user interactions, attributes, or other custom data points. Here’s a step-by-step guide on how to add custom dimensions to GA4.
Access GA4 Admin Panel:
- Log in to your Google Analytics account.
- Select the property you want to add custom dimensions to.
- Click on "Admin" (gear icon) in the bottom-left corner.
Create Custom Dimensions:
- In the "Property" column, click on "Custom Definitions".
- Select "Custom Dimensions".
- Click on the "Create Custom Dimension" button.
Configure Your Custom Dimension:
- Dimension Name: Enter a name for your custom dimension (e.g., "User Role").
- Scope: Choose the scope of the dimension. Options include Event, User, Session, and Item. Choose the one that best fits the data you are tracking.
- Description (optional): Provide a description to help identify the custom dimension.
- Event Parameter: Enter the name of the parameter that will be sent with your events (this should match the parameter name you use in your tagging setup).
Save the Custom Dimension:
- Click on "Save" to create the custom dimension.
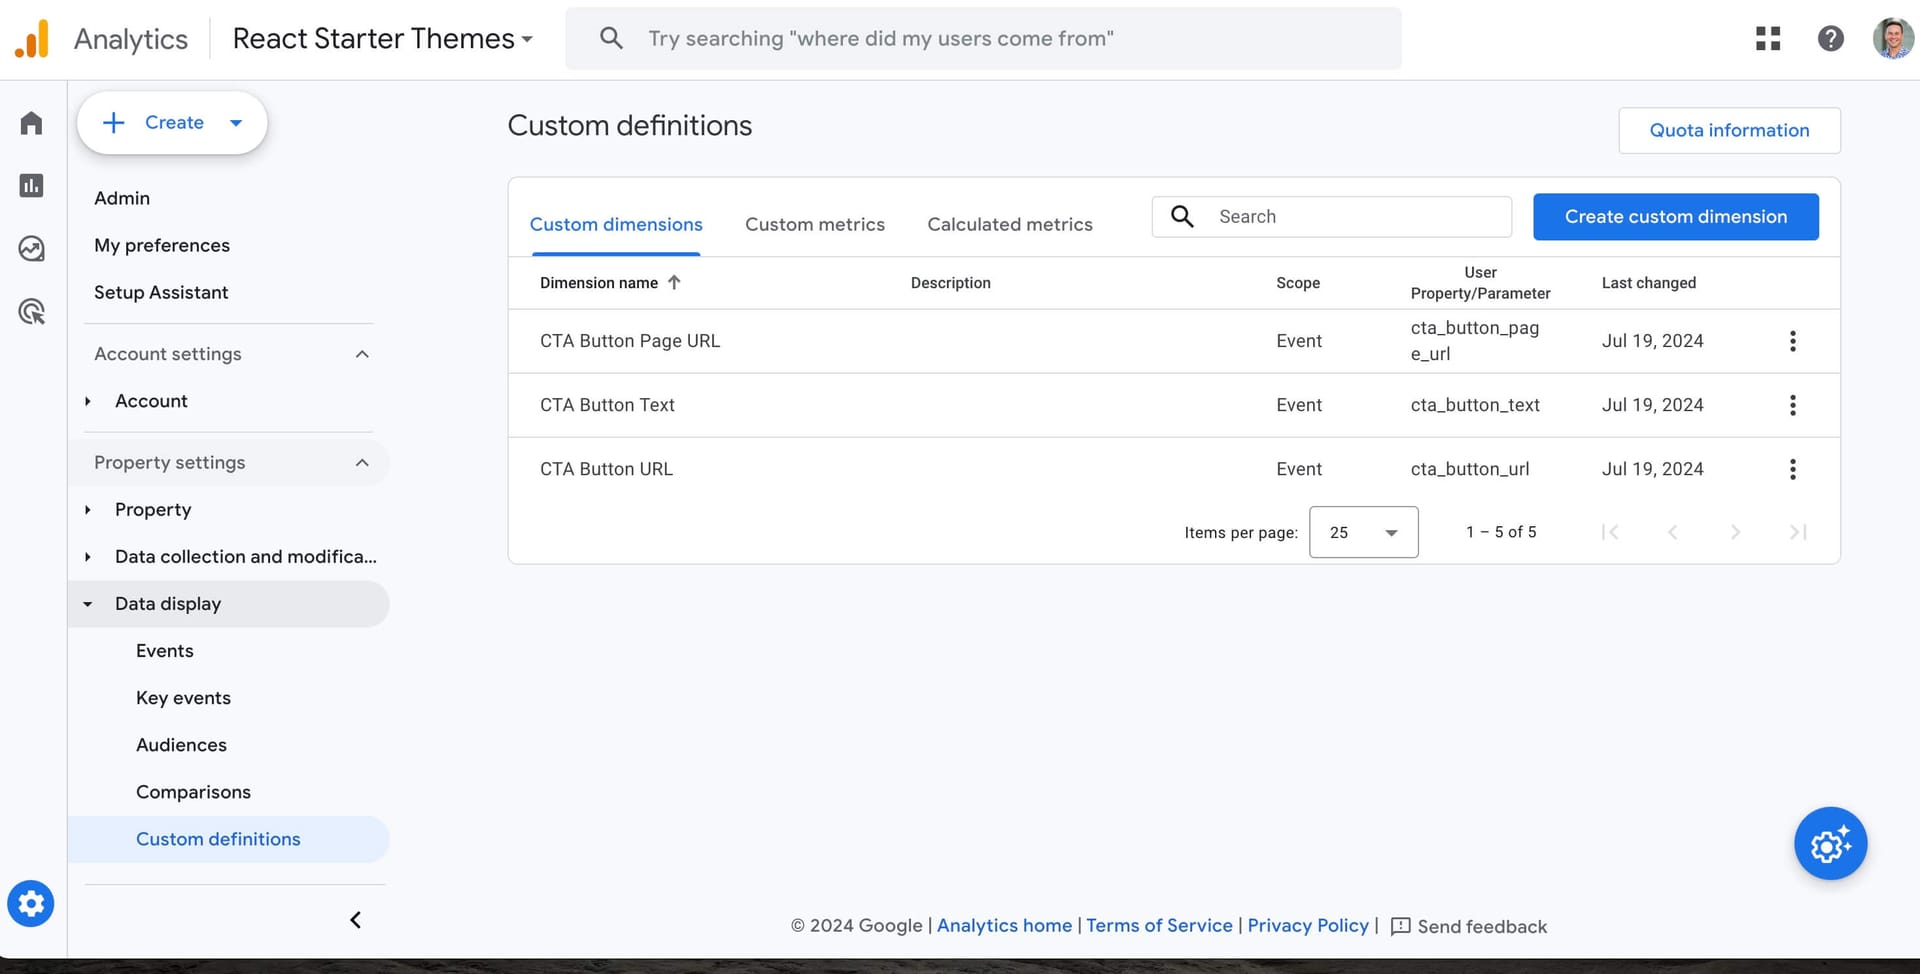
Add Custom definitions in GA4
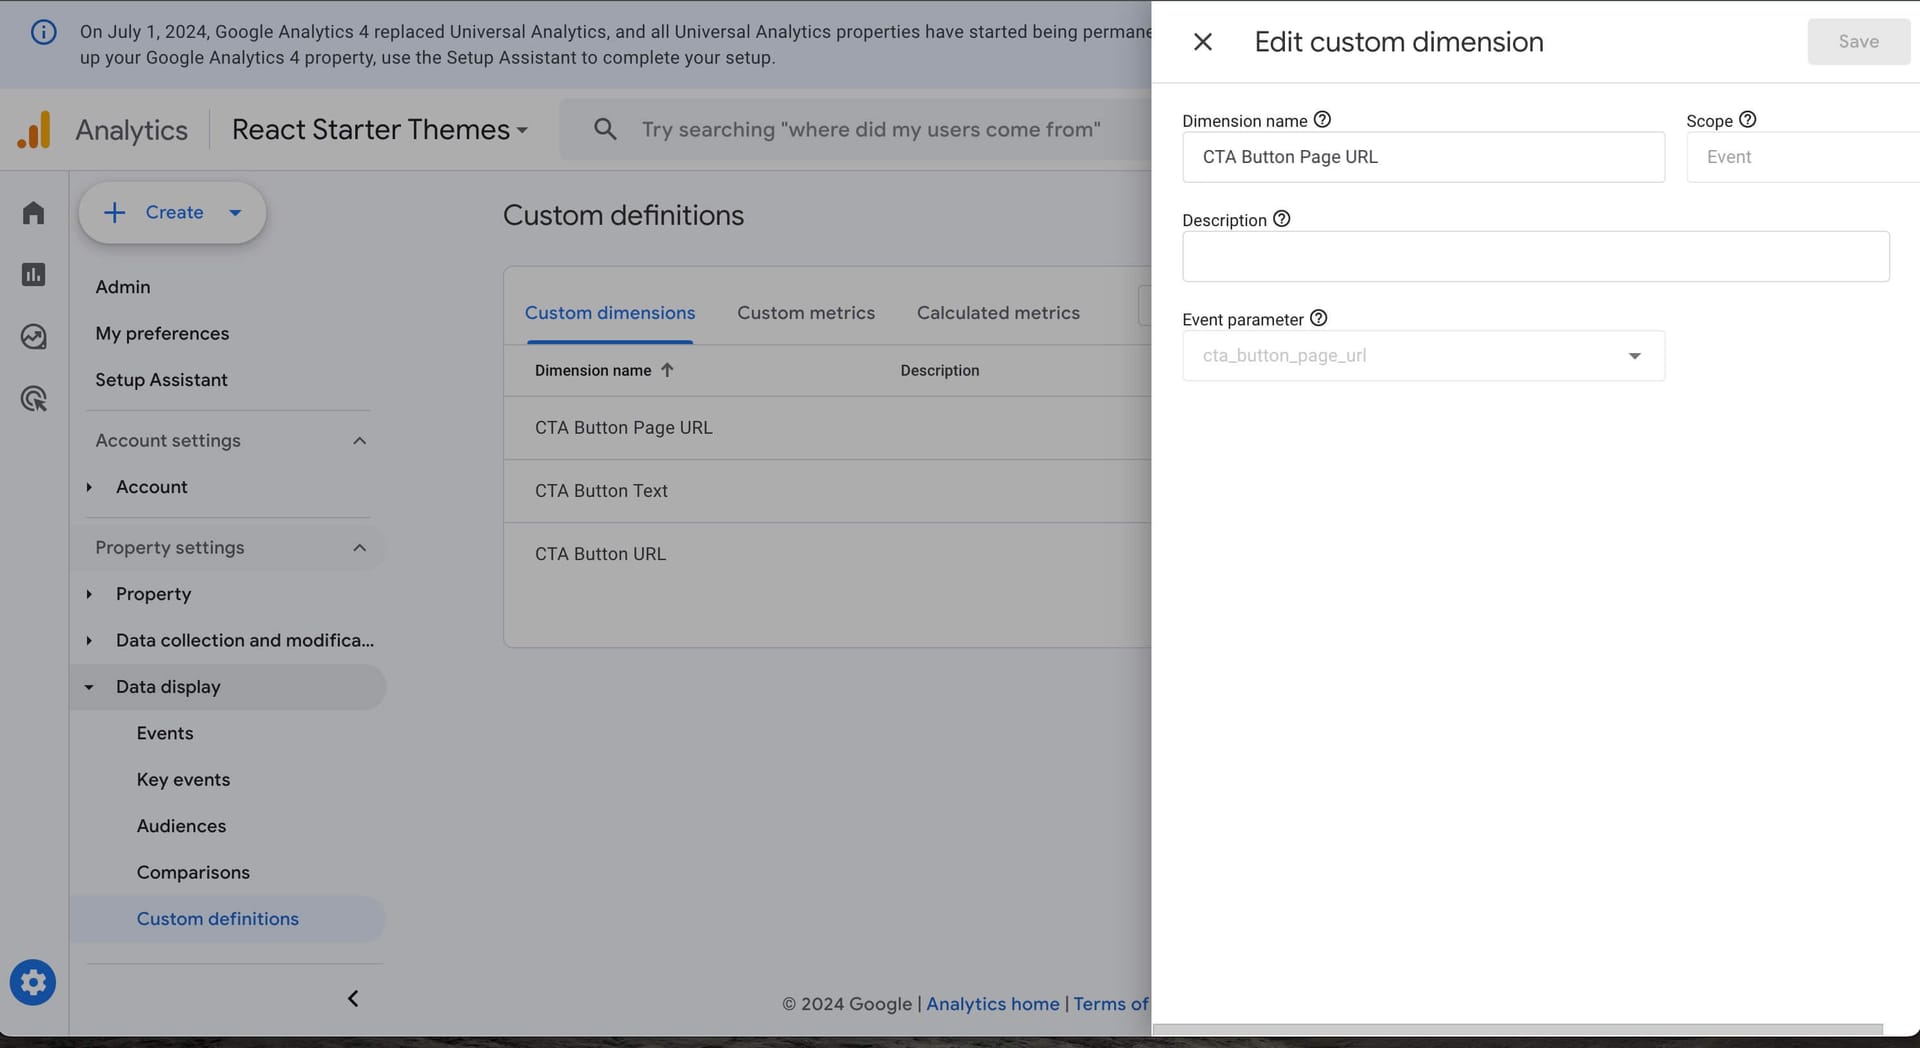
CTA Button Page URL
Step 6: Analyze the data in GA4
Once you have verified that the custom dimensions are being tracked, you can start analyzing the data in GA4.
Navigate to Reports:
- In GA4, go to "Reports" > "Analysis" to create custom reports using your custom dimensions.
- Use the "Explore" section to build detailed reports and analyze the data.
Create Custom Reports:
- Click on "Explore" and create a new exploration.
- Add your custom dimension as a dimension in the report.
- Analyze the data to gain insights based on the custom dimension.
Conclusion
Tracking button clicks using Google Tag Manager and Google Analytics 4 is a powerful way to gain insights into user behavior and optimize your website for better engagement. By following these steps, you can set up button click tracking quickly and efficiently. Happy tracking!
Need help?
This tutorial is brought to you by Backpack Works. Backpack Works is a full-stack design and development agency that builds pixel-perfect corporate marketing sites, web apps, and mobile apps.
The Backpack team is also the brains behind the React Starter Themes templates. Need any design help for your website, web app, or mobile app? We’ve got you covered.
Simply send us a note via our contact form and we will get back to you with next steps.
Subscribe to Our Newsletter
Receive the latest and video insights in your inbox.
By clicking the "Subscribe" button, you agree to receive email updates.


Professional Design and Development Services
Get in touch with us today to jumpstart your marketing machine. We are available for short and long term contracts in addition to our theme customizations.